

Contents:
What is preparation before final finishes?
Interior finishing is divided into preparation work and final finishes, sometimes with a further preparation stage immediately before the final finish. Preparation work involves getting substrates ready and levelling them for the future finish; it may also include building partitions and installing services. The specific scope is set out in the estimate and contract.
Confusion usually starts with the wording in the estimate and contract. The contractor writes “preparation work”, while the client expects walls that are already ready to paint. To make sure everyone means the same thing, it helps to agree on the terminology and boundaries of the work. The 101 blog has a separate explanation of how finishing differs from renovation and construction.
Preparation work should be described in terms of specific tasks and quantities. A label such as “preparatory works” without a breakdown almost always leads to a dispute.
Consider a hypothetical example: the tradesperson says the preparation stage is finished and is already calling in the painters. You arrive to find electrical outlet points in odd places and an uneven floor screed. You now have to choose between stopping the process and looking the other way, hoping that “the finishing work will level it out”. That choice is the price of a weak inspection and acceptance process.
What work does this stage include?
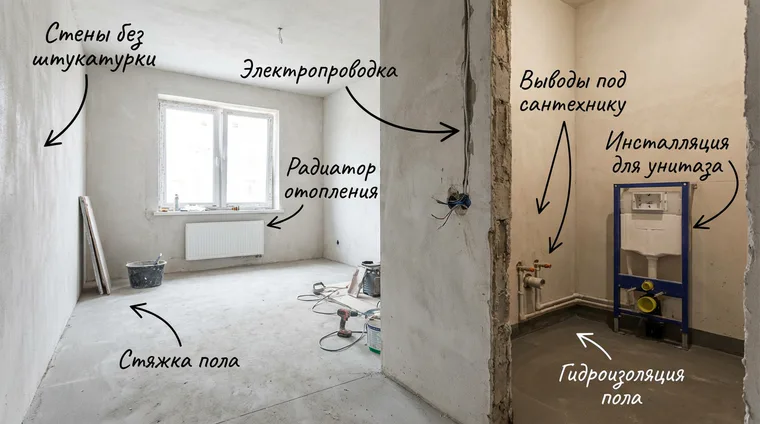
The scope depends on the property and the agreement. In a new-build property, preparation begins with the substrates and, if necessary, removal of finishes provided by the developer; the services work depends on the design and contract. In an existing property, there is also demolition, waste removal, substrate preparation and correction of problems with old wiring and pipes.
Check the scope against the estimate. When the estimate is organised by stages, preparation before final finishes appears as a set of clear blocks: plastering, floor screed, partitions, electrical installation and plumbing. Keeping the sequence of stages in one document helps you avoid getting lost in the detail.
A typical set of tasks often included in this stage is:
- Preparation: removing old finishes, cleaning surfaces, priming, removing waste and temporarily protecting openings and services.
- Partitions and openings: building and reinforcing partitions, forming recesses and service enclosures, installing concealed backing and supports, and preparing door openings.
- Building services: installing electrical and low-voltage cabling, water supply and drainage pipework, and provisions for ventilation and air conditioning where included in the design. A separate checklist and drawings are useful for services.
- Levelling surfaces: plastering walls, levelling ceilings using the selected method, laying floor screed and applying local repair compounds.
- Wet areas: waterproofing, preparation for tiling, falls in bathrooms and showers where specified, and treatment of junctions.
- Preparation for final finishes: cutting and filling chases, forming corners and reveals, and preparing substrates for skim coats or tiles, depending on the agreed scope.
Building services are sometimes treated as a separate stage. Check the estimate and contract to establish whether they are included in preparation work or accounted for separately.
Pros and cons of this stage
Preparation can seem unexciting: a lot of money is spent, while the apartment hardly looks different. Yet this stage determines the quality of the final finishes and when furniture installation can begin.
When done properly, preparation work offers several advantages:
- Room dimensions and surfaces become predictable, making it easier to install kitchen units, doors and skirting boards.
- Services become manageable: connection points, chases, manifolds and the distribution board do not have to be moved at the last minute.
- The risk of rework during final finishing decreases: finish materials are less forgiving than plaster and screed.
- You can close out the stage with documentation and payment, reducing the scope for endless unfinished tasks and requests for “just a little more”.
There are also drawbacks to understand in advance:
- Some work becomes concealed: once tiles and paint are in place, you cannot see what is beneath the finish.
- Inspection and acceptance take tools and time: a visual glance alone tells you very little.
- There are necessary waiting periods for screed drying, strength development and the required ventilation conditions.
- Mistakes are expensive to fix later: completed finishes have to be broken out, with waste removal and replacement materials on top.
Here is another hypothetical example: a client buys paint and expects the result to look “just like the visualisation”. The painter arrives and asks for two more coats of finishing compound and sanding. The argument starts with “But the walls have already been levelled”. In fact, they were prepared for wallpaper. Preparation without reference to the intended finish often ends in this conversation.
How do you inspect and accept the work?
Inspection and acceptance consist of a series of short checks after each block of work. After accepting plaster or screed, move on to the next layer only when the substrate is ready under the design and the requirements of the selected material. Cover services only after the necessary checks and tests.
For basic checks, use a tape measure, a spirit or laser level, a straightedge, a torch, a marker and a notebook. In wet areas, photographs of junctions are useful before tiles cover them.
You can follow this inspection process:
- Compare the estimate with the actual quantities: which walls were plastered, which partitions were built, and what was done to reveals, recesses and service enclosures. An estimate organised by sections and types of work makes this quicker.
- Check the geometry: wall verticality, surface flatness and angles in key locations, such as those for kitchen units, cupboards and concealed-frame doors.
- Check the substrates: screed without debonding or hollow areas, no significant cracks, sound junctions at walls and perimeter isolation strips where needed.
- Check service connection points: agreement with the drawings, their heights and positions, access to components, circuit and line labelling, and correct plumbing connection locations.
- Record issues: a defect list tied to each room, photographs, a correction deadline and the procedure for reinspection.
Concealed work deserves separate attention. These are tasks whose results become invisible after later stages. Common examples include waterproofing, cable installation, reinforcement, sound insulation and fixings for concealed supports. Record them before they are covered.
If work will be concealed tomorrow, inspect and accept it today: photographs, signatures, a clear description of what has been done and what will cover it at the next stage.
When should you involve a construction quality inspector? If the property is complex, there are extensive services, the layout is being changed or the final finishes have demanding requirements, technical supervision saves time on disputes and helps identify mistakes before they become rework. This is a separate role from the designer's supervision of compliance with the design.
Documentation: how do you sign off the stage?
Preparation work is rarely best closed out with a single final piece of paper saying “everything is done”. It is more reassuring to close it out in parts: complete a block of work, sign an acceptance record, pay and move on. This leaves fewer questions about what the payment covers and exactly what has been accepted.
The following documents help close out stages:
- A clearly structured estimate, with sections by type of work or stage. The 101 blog explains how to prepare an apartment renovation estimate (in Russian).
- Concealed-work inspection records document what will later become invisible. Choose the record format according to the requirements for the specific work and the contract; its contents and signatures must meet those requirements. Where work requires as-built documentation, follow the applicable procedure for preparing it.
- A completed-work acceptance certificate confirms that the work has been carried out and helps protect you in a dispute. KS-2 is an example of a form used in Russian construction practice; select the applicable form according to the requirements for the work and the contract. Read more about KS-2 on the 101 blog (in Russian).
This raises questions about money: how much does the stage cost, how should additional work be calculated, and how do you avoid paying twice for the same preparation? A working estimate with version history shows what changed and why.
A useful detail: photographs and videos taken at each stage often work better than long message threads. One clear sequence—what was done → how it was accepted → what the next stage will cover—can ease some of the tension between client and contractor. The 101 blog explores this approach through practical work tracking and documentation.
How can you oversee a renovation without visiting the site?
Preparation work needs frequent documentation, but visiting the property every time is inconvenient. A practical arrangement is for the contractor to post a report for each event: what was done, photographs before covering and photographs afterwards. You review it remotely, leave comments, receive corrections and agree on acceptance and payment. Measurements and necessary tests are carried out on site; a photo report does not replace them.
To reduce the confusion, follow a simple rule: record today any work that will be concealed tomorrow. You will then have fewer arguments about what lies beneath the tiles and who “should have warned whom”.